How do I set up a home network or Wi-Fi router?
BY: DA PUBLISHED: 2024-06-15 16:45:16 | UPDATED: 2026-02-02 23:50:02 | Views: 883
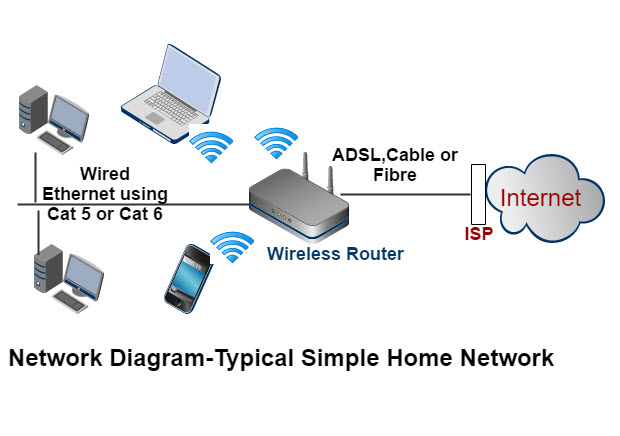
Setting up a home network or Wi-Fi router involves several steps, including physically connecting the router, configuring the router settings, and securing the network. Here is a step-by-step guide to help you through the process:

1. Unbox and Position the Router
- Unbox the router and make sure you have all necessary components, including the power adapter, Ethernet cables, and any included documentation.
- Position the Router in a central location in your home for optimal Wi-Fi coverage. Ideally, it should be placed in an elevated position, away from obstructions and electronic devices that could cause interference.
2. Connect the Hardware
- Power Connection: Plug the power adapter into the router and connect it to an electrical outlet.
- Internet Connection: Connect one end of an Ethernet cable to your modem (the device provided by your Internet Service Provider) and the other end to the WAN (Wide Area Network) or Internet port on your router.
3. Initial Router Setup
- Turn On the Router: Wait for the router to power up. This usually takes a few minutes.
- Connect to the Router: You can connect to the router using a computer, tablet, or smartphone. For initial setup, it's recommended to use a wired connection for stability. Connect an Ethernet cable from your device to one of the LAN (Local Area Network) ports on the router. Alternatively, you can connect wirelessly using the default SSID and password (usually found on a sticker on the router).
4. Access the Router’s Web Interface
- Open a Web Browser: On the connected device, open a web browser.
- Enter the Router’s IP Address: Type the router’s default IP address into the browser’s address bar. Common default IP addresses are 192.168.0.1, 192.168.1.1, or 192.168.1.254. Refer to the router’s manual if you're unsure.
- Log In: Enter the default username and password to log in. This information is typically found in the router’s manual or on a sticker on the router. Common default credentials are admin for both the username and password.
5. Configure Router Settings
- Change Default Login Credentials: For security purposes, change the default username and password to something more secure.
- Set Up the SSID and Password: Change the default SSID (Wi-Fi network name) and set a strong password. Use WPA3 if available, or WPA2 for security.
- Configure Other Settings: Depending on your needs, you might want to configure additional settings such as:
- Guest Network: Set up a guest network for visitors.
- Parental Controls: Manage access for different devices and users.
- QoS (Quality of Service): Prioritize certain types of traffic (e.g., streaming or gaming).
6. Test the Connection
- Reconnect Devices: Disconnect and then reconnect your devices to the newly configured Wi-Fi network using the new SSID and password.
- Check Internet Connectivity: Ensure that all devices can access the internet and perform a speed test to verify your connection speeds.
7. Secure the Network
- Firmware Updates: Check for and install any firmware updates for your router. This can improve performance and security.
- Network Security: Regularly check your network for unknown devices and update passwords periodically.
Additional Tips
- Save Configuration: Some routers allow you to save your configuration settings. This can be useful for future reference or if you need to reset the router.
- Advanced Configuration: If you have specific needs (e.g., VPN, port forwarding), refer to the router’s manual for advanced configuration options.
You May Also Like

5G: What It Means for You
1 year agoLatest Videos
Top 5 AMAZING Places to Visit in Ethiopi...
Oct 18, 2025Sea waves & beach drone video
Jun 21, 2025Related Articles

The Future of AI in the IT Industry: Tra...
1 year ago
5G: What It Means for You
1 year ago
